Collaboration on Checkpanel
Sharing checklists
You can give other users access to your checklists. You can either share one or more single checklists and/or give users access to your whole account. Users with access to your account can create new checklists in it and change the order of your existing checklists.
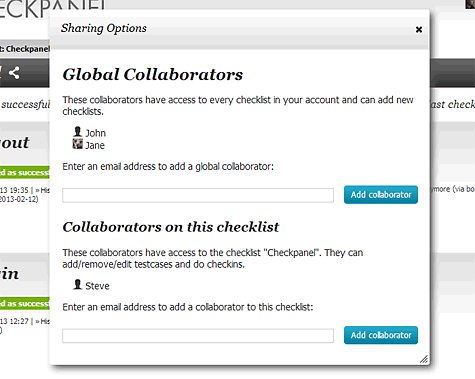
To give someone access to a specific checklist, open this checklist and click on the share icon. You will see a dialog showing your current collaborators. Enter the email address of your new teammate into the input field at the bottom of the section "Collaborators on this checklist". Click on "Add collaborator". If your teammate already has an account at Checkpanel he gets access right away. If not, you are asked to confirm the invitation of the new user. We will then send your future collaborator an email inviting her or him to join Checkpanel. After signing up, your teammate will have access to the checklist right away.
To give someone access to your whole account, do just the same, but enter the address into the input field of the section "Global Collaborators". You can open the sharing options either from a checklist or from your checklist index.
Working in teams
Once you have shared your checklists, you can work simultaneously on them. Checkpanel synchs data beween clients in realtime, so you immediately see new checks or changes by your teammates.
If a user reports a failed check, all other users receive an email including the failure report.

When you open a checklist, you can see who else is currently viewing the same checklist. All users are shown in the upper right corner, next to the logout button.
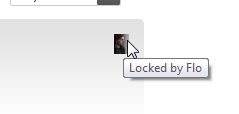
If a user edits an item, this test case gets locked for all other users to make sure that there are no conflicts. Locked items show the avatar of the user who is currently working on it in the place where the edit icons would usually be. As soon as the user is done editing or goes offline, the item is unlocked.
Changing your appearance
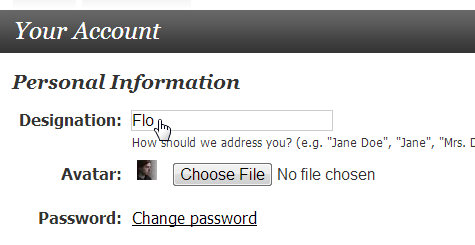
By default, Checkpanel uses the first name of your email address as your designation and a neutral image as avatar when showing your actions to team members. You can change both in your account settings. To change the avatar, just use the file selector dialog to choose any image from your computer. To change your designation, click on your current designation.
You can choose any designation you like. For example, it can be your full name like "John Doe", or more formal "Mr. Doe", or less format "John", "Johnny" or "JD".